Showing posts with label crochet. Show all posts

Sunday, September 4, 2016

Chunky Slouchy Beret Pattern

Hey there! Long time now see ... the blog has been sorely neglected for a very long time! I do pop in every now and then to see how it's holding up. It appears that the few patterns I have listed still get frequently viewed so I am hoping that A Hermit's Wish is still spreading the love! I'm actually posting today because I have a new pattern that I wanted to share with all my digital friends. It's a crochet chunky slouchy beret hat, which you can imagine is a SUPER QUICK project perfect for any of those last minute gift issues. Enjoy!


Chunky Slouchy Hat Pattern


Materials:
Q Hook
P Hook
Wool Ease Thick and Quick or Super Bulky yarn
Needle for weaving in ends

Using Q Hook
To Begin: Make Magic Circle

Round 1: Chain 2 (counts as 1 DC), DC 14 into ring, slip stitch into the top of the beginning chain 2. (15)

Round 2: Chain 2, make 1 DC into the same space as the Chain 2, 2DC in each stitch around. Slip stitch into the top of the beginning chain 2.(30)

Round 3: Chain 2, DC into next stitch, 2DC into the next stitch, *DC into the next 2 stitches, 2DC into next stitch* repeat ** around. Slip stitch into the top of the beginning chain 2.(40)

Round 4-5: Chain 2, DC in each stitch around. Slip stitch into the top of the beginning chain 2.(40)

Switch to P Hook
Round 6: Chain 2, DC in next 7 stitches, DC2together. *DC in next 8 stitches, DC2together* repeat around. Slip stitch into the top of the beginning chain 2. (35)

Round 7: Chain 2, DC in each stitch around. Slip stitch into the top of the beginning chain 2. (35)

Round 8-10: Chain 1, SC around. (35)

Monday, March 11, 2013

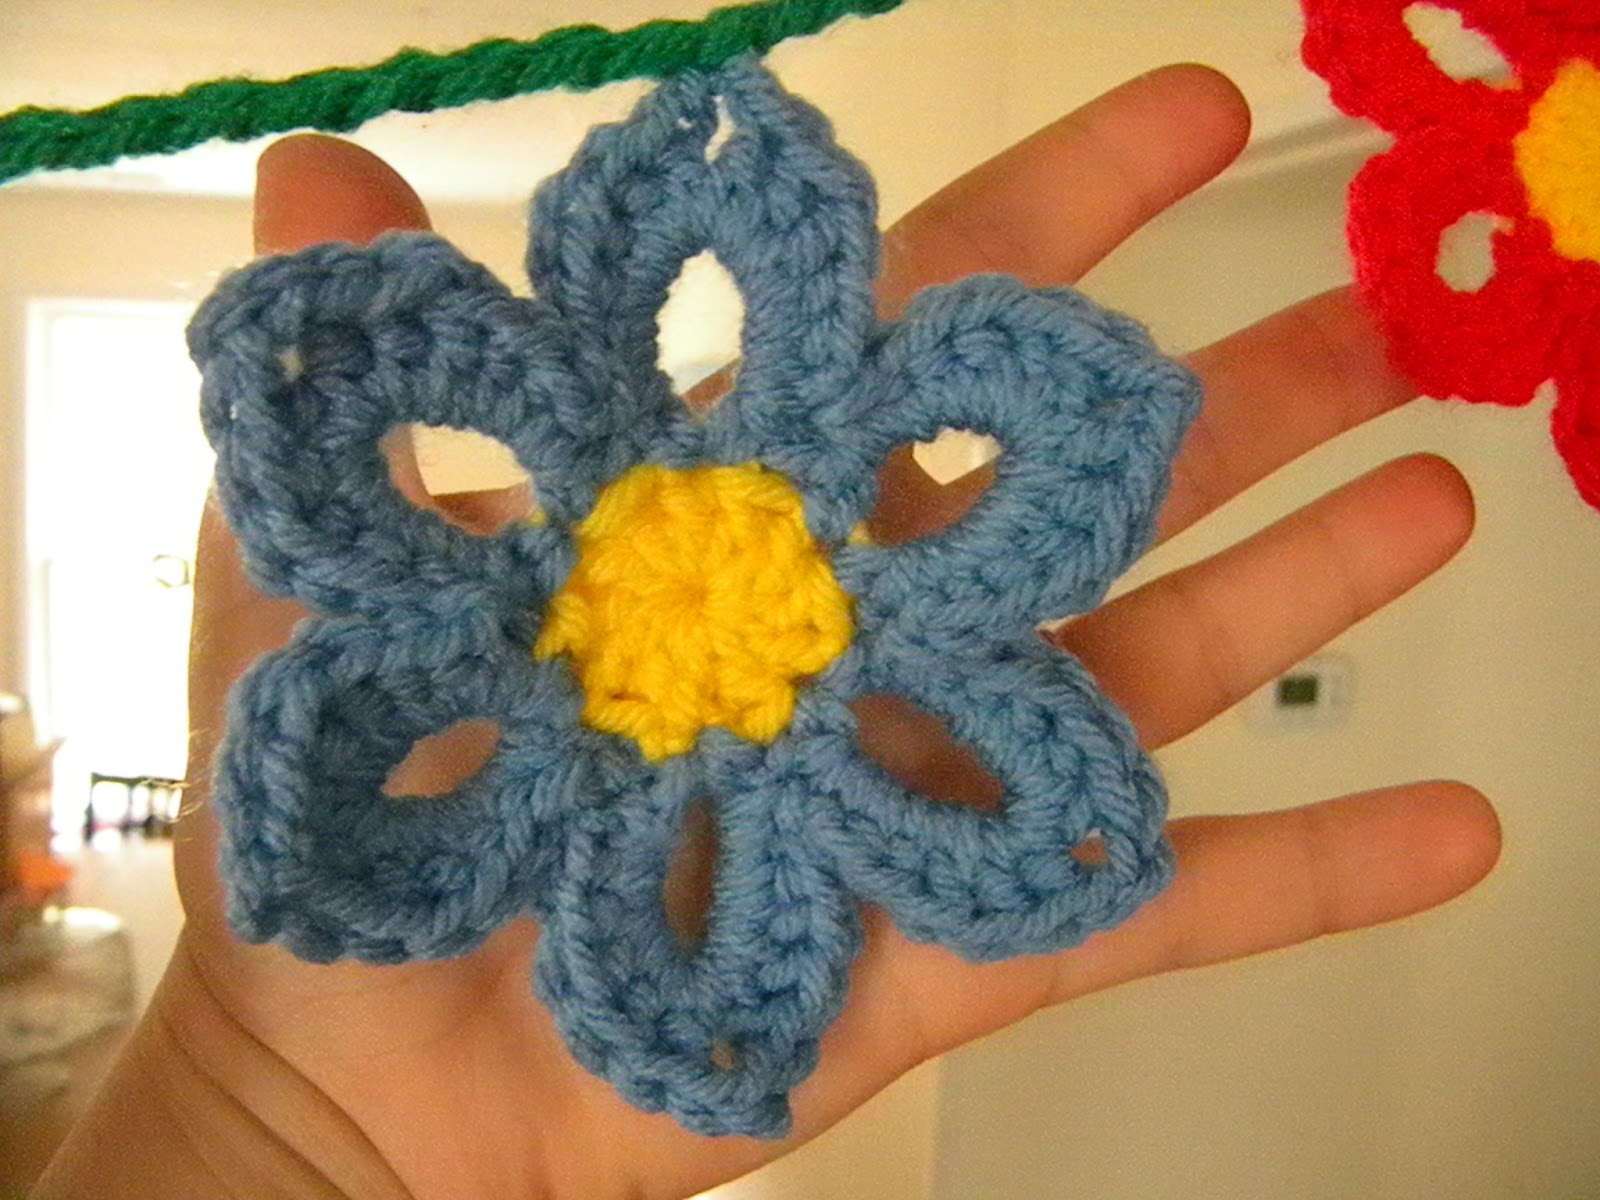
Crochet Spring Flower Garland Pattern


I love seasonal garlands. With Spring right around the corner I just had to create a new flowery garland. Hope you all enjoy this pattern!

Materials Needed:
Yarn: Worsted Weight, assorted colors
Hook: I/5.50 mm 
Darning Needle

Stitches and Techniques:
Magic/Adjustable Ring
Chain
SC - Single Crochet
HDC - Half Double Crochet
DC - Double Crochet
Slip Stitch

Good to know

  • The number of flowers you make will depend on how long you would like your garland to be ... I made 8 flowers.
  • After you have made your flowers, weave in ends and block to help shape them. A light press is helpful too. 

Pattern: 

Flower:
Begin with Magic Circle/Adjustable Ring using Yellow yarn.
Round 1: Chain 2 then crochet DC 11 times in ring, a total of 12 stitches.  Pull the ring tight, then slip stitch into the top of chain 2. Tie off.

Round 2: Switch to color for petals. 

Anchor the new color with a SC ...

Then in same stitch Chain 6, SC, *Chain 1, Skip next stitch, then in next stitch SC, Chain 6, SC*


 Repeat around until you have 6 loops for petals. Chain 1 and Slip Stitch into the first SC made


 DON'T TIE OFF CONTINUE WITH SAME COLOR.

Round 3: You will be making the petals by working out of each Chain 6 loop. Each flower petal will be the same as the first one. So, here we go!

*SC, HDC, HDC, DC, DC, DC, Chain 2, DC, DC, DC, HDC, HDC, SC* 


Now repeat in each of the next 5 loops. Slip stitch in first SC, tie off, and weave in ends!


Viola! Pretty!


To Create Garland:
Using Green, chain 25, *Slip Stitch in the top of one of the Chain 2 of one of the petals, Chain 15* repeat** until you have attached your last flower and then chain 25, tie off and you are done! Hang and LOOOOVE!


Sunday, February 24, 2013

Daleks, Daffodils, and Grannys

Happy Sunday!
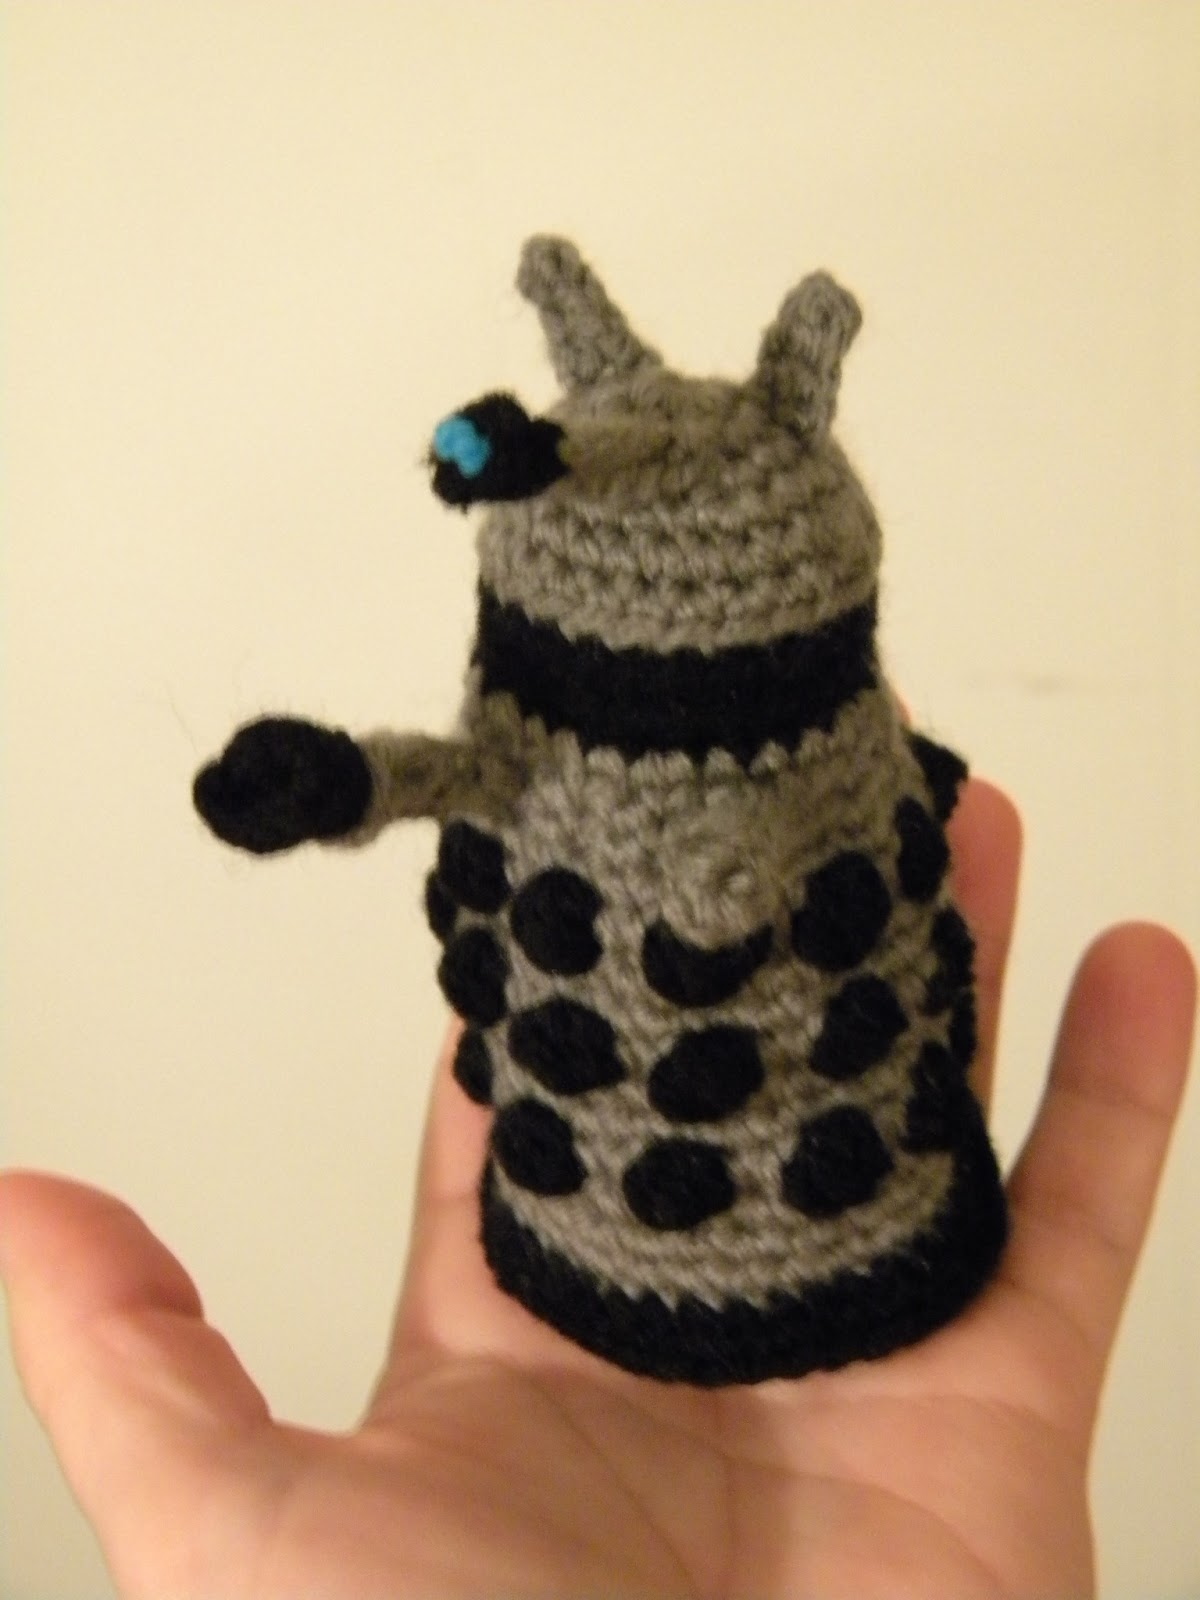
I recently made this little Dalek ... I got the basic pattern from Elle Skene on Ravelry. The original pattern was made as an Egg Cozy. A very cute idea, especially with Easter coming up. However, I really couldn't think of any reason I would need an Egg cozy so I went ahead and just made a stuffed version. 
Project Notes:
Hook: 4.00 mm/G
Yarn: Worsted Wieght Acrylic

My Alternations:
-First I changed this pattern up a little by increasing the black row at the bottom once more ... so it went: *2SC, SC, SC, SC, SC* all the way around. In the next round I crocheted only in the front loops. I then made a base by creating a flat circle. Starting with 6 SC in a magic ring and increased by one 5 times. I then stuffed the Dalek ... not too tightly though because I wanted it to sit flat and stand up. After simply attach the flat circle to the bottom by using a whip stitch and you're done!
- I added the little "ears" by simply chaining 4, then slip stitching in the second chain from hook down. Sew to top of head. 
-I also added the little "eye" piece at the end of the scope. I did this by SC4 in a Magic ring. I then tied a blue knot and sewed it to the center when I attached the black piece to the grey. 

I looooove this little Dalek! I can't wait to make more. I want to make one for all my Whovian friends ... if only time would allow!


I have also returned to working on my Summer Garden Granny Square Throw blanket.... 
It has been put away for quite some time while I focused on some other projects but I have decided I want to finish this piece sooner than later. 


So many wild colors!


Stacks of Squares!!!


I have decided to mix the blanket up a bit by added a few large squares randomly throughout ... here are the four I have made so far. I just love staring at them!

I still have quite a few more squares to go. So far I have 34/75 Small Squares and 4/5 Large Squares ... then I have to weave in ends, block them, sew them together AND create a border.

Lots and lots to do! Wish me luck!

Friday, January 4, 2013

Simple Mangosteen Crochet Pattern


A Mangosteen is a type of fruit I first tasted in Southeast Asia. It seems to have received a lot of attention the past decade as an ingredient in “health” drinks and supplements. I can’t say how true the claims that mangosteen is “good” for your health, but it is a fruit and it is delicious so it’s got that going for it.  There is a pretty comprehensive website about mangosteens if you want to learn more. www.mangosteen.com

The pattern below is very simple, but the stem may be a bit tricky for beginners.


Materials:
  • Worsted weight yarn – purples (body) & greens (stem) – I went with very bright purple and green … obviously not the most realistic of colors – but hey – it’s a crocheted fruit – give me a break! Anyway, any colors you pick in those families will do just nicely. 
  • Hook - G/4.00mm
  • Stitch Maker (I like to use safety pins)
  • Fiber filling (I use polyfil)
  • Needle for stitching and darning

Stitches & Techniques you need to know:
  • Magic Ring
  • Crocheting in Continuous Rounds (Amigurumi style)
  • Slip Stitch  (SLST)
  • Single Crochet (SC)
  • Half Double Crochet (HDC)
  • Double Crochet (DC)
  • Single Crochet 2 Together (SC2TOG)
  • Repeat Between **

THE BODY:

USING YOUR PURPLE YARN MAKE MAGIC CIRCLE, THEN CH1

ROUND 1: SC 6 INTO CIRCLE, PULL TIGHT

ROUND 2: SC 2 IN EACH SC (you are now crocheting in the round, you do not need to slip stitch in the first stitch from the first round – you simply start the next round in that stitch, get it?) Use your stitch marker after you have made your first SC so you know where your next round will begin. 
ROUND 3: *SC 2 IN FIRST SC, THEN SC IN NEXT*
ROUND 4: *SC 2 IN FIRST SC, THEN SC IN NEXT 2*
ROUND 5: *SC 2 IN FIRST SC, THEN SC IN NEXT 3*
ROUND 6: *SC 2 IN FIRST SC, THEN SC IN NEXT 4*
ROUND 7: *SC 2 IN FIRST SC, THEN SC IN NEXT 5*
ROUND 8: *SC 2 IN FIRST SC, THEN SC IN NEXT 6*
ROUND 9-12: SC IN EACH STITCH
ROUND 13: *SC2TOG, SC IN 6*
ROUND 14: *SC2TOG, SC IN 5*
ROUND 15: *SC2TOG, SC IN 4*
ROUND 16: *SC2TOG, SC IN 3*
ROUND 17: *SC2TOG, SC IN 2*
ROUND 18: SC2TO, SC*
ROUND 19: SC2TOG
FINISHING THE BODY: LEAVE A LONG TAIL!!! THREAD THROUGH REMAINING STITCHES AND PULL TIGHT. WITH THE REMAINING TAIL PUSH YOUR NEEDLE THROUGH THE CENTER OF THE BODY UP THROUGH THE CENTER OF THE FIRST ROUND (SMALL HOLE). PULL THE YARN TIGHT SO IT CREATES A SORT OF INDENTION IN THE BOTTOM OF THE BODY. THIS WILL ALLOW THE FRUIT TO SIT FLATLY ON A SURFACE AND NOT TOPPLE OVER. WHEN FINISHED TIE OFF AND WEAVE IN ENDS.

STEM:
MAKE MAGIC CIRCLE, CH 1
ROUND1: CROCHET 4 SC LOOSELY IN MAGIC RING, PULL RIGHT TIGHT
ROUND2-4: SC IN EACH SC
ROUND 5: CROCHET THROUGH FRONT LOOP ONLY!
YOU ARE NOW MAKING THE "PETALS" AT THE BASE OF THE STEM. EACH OF THE 4 SC WILL BECOME A “PETAL."

IN FIRST SC: SLST, HDC, DC, DC, HDC, SC
IN SECOND SC: SLST, HDC, DC, DC, HDC, SC                  
IN THIRD SC: SLST, HDC, DC, DC, HDC, SC
IN FOURTH SC: SLST, HDC, DC, DC, HDC, SC – SLST IN THE FIRST PETAL AND TIGHT OFF … LEAVE LONG TAIL FOR SEWING.
FINISHING THE STEM: SEW THE STEM TO THE TOP OF THE BODY. WITH THE REMAINING GREEN THREAD PUSH YOUR NEEDLE DOWN TO THE BOTTOM OF THE  FRUIT AND EMBROIDER A LITTLE BOTTOM.

Hope you found my pattern easy! It shouldn't take very long to make one of these. What I like about this pattern is that it can be a base for so many other types of things! You are pretty much making a ball for the body. Change the colors and you could make a tomato, pumpkin ...etc. 

Please feel free to leave a comment if you have any questions at all, I would also love to see your finished mangosteen if you have one to share! 

** I will add that I hope to make another Mangosteen that has been opened to show off the white pulpy deliciousness that is inside! **


Friday, September 7, 2012

Simple Crochet Hat/Beanie Pattern


I have searched and searched for a basic crochet beanie/hat since I first started crocheting. I have tried several different hat patterns and finally figured the best "recipe" for a simple beanie that worked for me. I could whip one of these up in the course of an evening.  Add frills at your own discretion.


This is my first real attempt at writing out a pattern - it's super simple so that made it feel possible. . .


Simple Beanie Pattern

Materials:
Yarn: Worsted Weight ... I used "I Love This Yarn"
Hook: I
Needle for Darning

Stitches Used:

  • Magic Ring
  • Chain
  • Double Crochet (DC)
  • Slip Stitch
The hat is made in rounds, joined at the end of each round. 


Rnd 1: Start with Magic Ring... Chain 2, 9 double crochet. Slip stitch in top of first chain 2 (10 sts)

Rnd 2: Chain 2, double crochet in same stitch. 2 double crochet in each stitch around. Join with slip stitch in top of first Chain 2. (20 sts)

Rnd 3: Chain 2, 2 DC in next stitch. *1DC in next stitch, 2DC in next stitch* Join with slip stitch in top of first Chain 2. (30 sts)

Rnd 4: Chain 2, DC in next stitch, 2 DC in next stitch. *1 DC in next 2 stitches, 2 DC in next stitch. Repeat from*  Join with slip stitch in top of first Chain 2. (40 sts)

Rnd 5: Chain 2, DC in next 2 sts, 2 DC in next stitch. *1 DC in next 3 stitches, 2 DC in next stitch. Repeat from*  Join with slip stitch in top of first Chain 2. (50 sts)

Rnd 6: Chain 2, DC in next 3 stitches, 2 DC in next stitch. *1 DC in next 4 stitches, 2 DC in next stitch. Repeat from*  Join with slip stitch in top of first Chain 2. (60 sts)

Rnd 7-16: Chain 2, DC in every stitch.  Join with slip stitch in top of first Chain 2 . Fasten off and weave in yarn. (60 sts)*


*You may need to increase the amount of row depending on the size of the head you are making the hat for. This pattern worked for my head, but if you need a larger size add more rows.

Good Luck! 


Fun Fall Fingerless Gloves!

Fall is quickly approaching I decided to make some fun accessories... The fingerless gloves seemed perfect! I absolutely LOVE how these turned out. 

I got the basic idea from Lucy at Attic 24 ... she called them Wrist Warmers. From Lucy's instructions I kept the edging, basic concept of crocheting in rows and sewing up the edge to finish. I also used her pattern for the little flower establishments. I varied from her pattern though in that I made mine a bit more fitted around the wrist. . . I decreased by 2 for a couple rows near my wrist. This is a much snugger fit - the other way was a bit boxy for me but I guess it helps to accommodate for watches and bracelets ... which I don't wear. 


Here is the basic pattern for making these:
- Chain as many as needed to fit snug around your wrist or forearm. Yarn and hook size don't matter here ... as long as you are happy with the tightness/looseness of the stitches. I find some give is good! 
- Then work in rows back and forth until you have the length desired. The Half Double Crochet stitch is what  most people like to use. Remember if you want a more fitted glove you may want to decrease for a few rows  right where your wrist meets your hand. Just don't forget to increase again for the part that cover your hand! (I only decreased 2 times for mine).
- Sew up the sides - but don't forget the thumb!
- About and inch/inch and half down  is a good measurement for the thumb, but as everyone's hand is different this could be different for you. :)
- Viola! Embellish as desired ... *
I suppose this isn't a real pattern ... Lucy probably explains it better on her site. 
*These can be one solid color or striped - your call! 

I'm still new at writing out patterns or giving instructions. 

Wednesday, August 29, 2012

Amigurumi - Crochet Toys


I have been wanting to write a post about some of the amigurumi projects I have worked on in the past for some time now. Making toys is what first got me excited about crochet, and I still LOVE to make them. There is something very satisfying about creating all the different elements and then putting them together to make a creature with a little face. . . 

The ant in the picture above is my own creation ... but I didn't record the pattern ... sorry!
Anyway - hope you enjoy!


This is the best octopus pattern I have found. Small, cute and quick to whip up! I purchased this pattern from Ruby Submarine - I highly recommend this pattern!

 This was another fun quick little project ... I could make a million of these little guys! I found this Turtle pattern on Ravelry ... I just made a few small alteration. I love free patterns!


These fish, and many of the following critters I found in two books by Ana Paula. I highly recommend her pattern books to anyone who would like to make some toys, I was still very new to crochet when I bought these books and still had little trouble following her patterns. The great thing about amigurumi is the only stitch you really need to know how to do is single crochet. It's a fun way to start crochet!


The little lion is one of my favorites!


This squid was the first toy I ever made! I was so proud! :)
I apologize for the poor quality of some of these photos,
many of them were taken with my old camera  phone.
I created this Squidbilly all on my own. I didn't write down the pattern ...
 Well, that's about it for now ... I have made many other toys but can't seem to find any other pics... Let me know if you have any questions about how to find toy patterns!