Pages

Tuesday, July 2, 2013

Crochet Lightning Bolt Pattern


Hello there! Below is a very basic pattern for a simple Crochet Lightning Bolt Applique, Bookmark ... or whatever you can think of! I created this pattern while making items for a Harry Potter conference craft fair. I made several other items for the fair that I can't wait to share with you! Enjoy this pattern and let me know if you have any questions.


Lightning Bolt
Things You'll Need:
Yarn: Worsted Weight, I used Red Heart but I would think a sturdy cotton would work even better for the shaping.
Hook: G or 4 mm
Needle for weaving in Ends

Stitches to Know:
Single Crochet (SC)
Slip Stitch (SlSt)
Chain (CH)

To begin CH 8
Row 1: Turn and SC in second CH from hook and continue to the end, CH 1, turn
Row 2:SC in each SC (7 stitches), CH 1, turn
Row 3: SC in each SC (7 stitches), do NOT CH 1, turn
Row 4: SC in the second SC from the hook (6 stitches), CH 1, turn
Row 5: SC across (6 stitches), do NOT CH 1, turn
Row 6: SC in second SC from hook, SC across, when you reach the end CH 3, turn
Row 7: SC in the second CH from hook, SC in next CH, SC in next 3 SC (5 stitches), CH 1, turn
Row 8: SC across (5 stitches), CH 1, turn
Row 9: SC across (5 stitches), do NOT CH 1, turn
Row 10: SC in second SC from hook, SC across (4 stitches), CH 1, turn
Row 11: SC across (4 stitches) then CH 3, turn
Row 12: SC in second CH from hook. SC in next CH, then SC in the next 2 SC  (4 stitches), CH 1, turn
Row 13: SC across (4 stitches) do NOT CH 1, turn
Row 14: SC in second SC and across (3 stitches), CH 1, turn
Row 15: SC across (3 stitches), do NOT CH 1, turn
Row 16: SC in second SC from hook, SC next SC,(2 stitches) CH 1, turn
Row 17: SC in the two SC, so NOT CH 1, turn
Row 18: SC in second SC from hook leaving one SC, CH 1, turn
Row 19: SC in last SC, CH 1

Edging: 
To tighten up the shape of the bolt, SlSt around the whole bolt, CH 2 at each outer corner to help make more of a pointed edge.


Crochet Lightning Bolt


Hello there! Below is a very basic pattern for a simple Crochet Lightning Bolt Applique, Bookmark ... or whatever you can think of! I created this pattern while making items for a Harry Potter conference craft fair. Enjoy this pattern and let me know if you have any questions.


Lightning Bolt
Things You'll Need:
Yarn: Worsted Weight, I used Red Heart but I would think a sturdy cotton would work even better for the shaping.
Hook: G or 4 mm
Needle for weaving in Ends

Stitches to Know:
Single Crochet (SC)
Slip Stitch (SlSt)
Chain (CH)


To begin CH 8
Row 1: Turn and SC in second CH from hook and continue to the end, CH 1, turn
Row 2:SC in each SC (7 stitches), CH 1, turn
Row 4: SC in the second SC from the hook (6 stitches), CH 1, turn
Row 5: SC across (6 stitches), do NOT CH 1, turn
Row 6: SC in second SC from hook, SC across, when you reach the end CH 3, turn
Row 7: SC in the second CH from hook, SC in next CH, SC in next 3 SC (5 stitches), CH 1, turn 
Row 9: SC across (5 stitches), do NOT CH 1, turn
Row 10: SC in second SC from hook, SC across (4 stitches), CH 1, turn
Row 11: SC across (4 stitches) then CH 3, turn
Row 12: SC in second CH from hook. SC in next CH, then SC in the next 2 SC  (4 stitches), CH 1, turn
Row 13: SC across (4 stitches) do NOT CH 1, turn
Row 14: SC in second SC and across (3 stitches), CH 1, turn
Row 15: SC across (3 stitches), do NOT CH 1, turn
Row 16: SC in second SC from hook, SC next SC,(2 stitches) CH 1, turn
Row 17: SC in the two SC, so NOT CH 1, turn
Row 18: SC in second SC from hook leaving one SC, CH 1, turn
Row 19: SC in last SC, CH 1
Round 1: To tighten up the shape of the bolt, SlSt around the whole bolt, CH 2 at each outer corner to help make more of a pointed edge.


Row 3: SC in each SC (7 stitches), do NOT CH 1, turn
Row 8: SC across (5 stitches), CH 1, turn


Monday, July 1, 2013

Crochet Drawstring Pouch Pattern


This pattern for a little drawstring pouch is pretty basic. I was inspired to make this by my friend Leisa of Mystical Hodgepodge, who thought these would sell well at an upcoming scifi/fantasy conference. This pouch is just the right size to hold gaming dice, cards, fairy dust ... the usual.


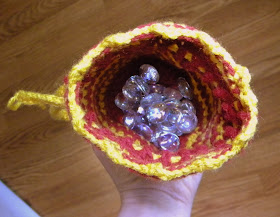
I had a lot of fun whipping up this pattern and plan to make about ten in varying color combos. The color scheme of the pouch pictured is for Gryffindor of the Harry Potter series.

I am still new to writing patterns so please please please message me if you get confused or have any questions! 

Enjoy!

Small Crochet Drawstring Pouch Pattern

What You'll Need:
- Yarn: Worsted Weight, one or more colors
- Hook: H or 5mm
- Needle for weaving in ends

Things to know: 
- Each round begins by chaining the appropriate amount for the stitch in the round.
       ex. a Double Crochet round would start with a Chain 2

- the Chain in the beginning of each round does not count as a stitch, it is simply a "step-up" to begin the next round, be sure you make your first stitches in the same space as the Chain.

-  each round ends with a slip stitch into the top of the first actual stitch, NOT the chain.

- If you choose to use multiple colors I recommend using the darker color for the bottom.   I began alternating at  round 7. But it's your project so use whatever colors you like!

When I alternate colors for the stripes on my two colored pouch I simply carry the yarn up each round as pictured below:
Hardly notice the seam (it's on the inside anyway) and makes for quicker work and much fewer ends to weave in! Yuck! Who likes weaving in ends? 

The Pouch:
To begin make a Magic Ring (MR)

Round 1: Chain (CH) 2 Double Crochet (DC) 10 in MR, join with Slip Stitch (SlSt) into the top of first DC. 
Round 2: CH2 and 2DC  in the same space, 2DC in each stitch around, join with SlSt into the top of first DC. 
Round 3: CH2 and 2DC, DC, 2DC, DC, repeat around, join with SlSt into the top of first DC. 
Round 4: CH1 and 2 Single Crochet(SC), SC, SC, 2SC repeat around, join with SlSt into the top of the first SC.
Round 5: CH1 and (working in back loops only) SC,  SC in each stitch around, join with SlSt into the first SC (both loops). 
Round 6-14: CH2 and DC in each stitch around, join with SlSt into the top of first DC. 
The next round is the where you will eventually thread the drawstring.
Round 15: CH3 and Treble Crochet (TC) around, join with SlSt into the top of the first TC.
Round 16-17: CH2 and DC Around, join with SlSt into top of first DC.
Round 18: CH1 and SC around, join with SlSt into the top of first SC.
Trimming! The final round it to give the pouch just a little style, I would imagine many different borders could work here. Or maybe you prefer no "border" at all? I like this simple tiny picot border I first stumbled upon over at Attic24. Thanks again Lucy!
Round 19: CH1 and SlSt into the first 3 stitches, in the next stitch SC CH2 SC, then SlSt  into the next 3 stitches, repeat this around, join into your first SlSt.
Weave in ends and you're done with the basic pouch portion!

Drawstring:
Row 1: CH 50, tie off (to create tassel, if you don't want a tassel then CH1 extra. And turn your work, begin next row in second chain from hook.)
Row 2: SlSt in second CH from hook and continue to the end. Tie off. 

To finish thread your drawstring through the Treble Crochet round alternating in and out of each stitch.

Viola! Done!!!


Hope you enjoy my pattern!