Pages

Saturday, November 3, 2012

2,000 Views!

Hey All!

I am very excited today because my blog as reached 2,000 views! I have been working hard on my humble little blog since March and have been so happy with its evolution since then. I definitely enjoy it as a place to show-and-tell all my crochet projects ramble about all the other goings on in my life back in the enchanted hollow. I just wanted to thank everyone who visits my blog regularly and most importantly give me feed back! I love hearing from everyone who reads my blog, just as much as I love commenting on other blogs. 

I'll keep puttering away at this, if you keep reading!

Here is a sneak peek at my granny square throw I have been working on ... COLORS!!


Tuesday, October 30, 2012

Final Days of Fall and Baby Pumpkin Beanie


PUMPKIN BEANIE

This Little Pumpkin Beanie was super super easy to make! I kept searching and searching for a pumpkin beanie and I just didn't care for any of them, so I just sort of guessed at what to do and I really like the way It tuned out! What is also great about this hat pattern is that  it could also be used to make an apple beanie.
WHAT YOU NEED:
- Worsted Wieght Yarn in Green and Orange
- Size H or I Hook
- Darning Needle
-Stitch Marker

WHAT YOU NEED TO KNOW:
- Magic Ring
- SC = Single Crochet
- How to work in the round - this means no Slip Stitch and Step up at the end of the round - you just keep going - you know your place because you use a stitch marker after your first round of SC and keep using it until you are done. 

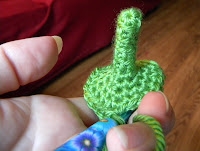
First start with stem and then work in the round.  
Here's what I did.

Stem: Using Green Yarn and size H Hook, 
Make Magic Ring and crochet 6SC in ring.
Continue in the round until you have the length you want. 
(use a stitch marker so you know where your round starts/ends)
Once you have the length desired just increase by one each round. Soooo...
SC 2 in each SC for the first round off the stem =  12 stitches.
Next round, SC in SC, SC2 in SC ... repeat around.
Next round, SC in SC, SC in SC, SC2 in SC ...repeat around.
Next round, SC in SC, SC in SC, SC in SC, SC2 in SC
So on and so forth.
Continue with green until you are ready to switch colors.
When you switch to orange, use size I Hook
keep continuing increasing with the orange until you have the right size to fit your baby or child or maybe yourself? I just kept putting it on my baby's head! ;)
After you have achieved the right width, just keep crocheting 1SC in each SC with no increases until you have the right length. Then slip stitch and tie off  and weave in ends! 

You could easily add ear flaps to this, or a decorative little edging. I made this for my son so I kept it simple. 
I think the leaf makes it even sweeter! 
I know this isn't a true pattern, so please message me or comment if you need help!
 V

Sunday, September 23, 2012

Easy Apple Turnover Recipe

       For many people Fall is the season of the Pumpkin, but personally I prefer Apples. I have been craving apple turnovers lately, so I decided to whip some up ... this is a very quick and easy recipe, with just a few ingredients most people have in their cabinets.

 What You'll Need:
-  4 Gala Apples (Granny Smith works too)
- 3 Tablespoons Butter
- 1 Cup Brown Sugar
- 1 Tablespoon Cinnamon
- 1 Tablespoon Corn Starch
- 2 Tablespoons Lemon Juice
- 1 pkg frozen Puff Pastry thawed
- Flower for dusting


PREHEAT OVEN TO  400 Degrees


First Peel, Core, and Chop Apples. 
Place applies in a bowl of water with the Lemon Juice to keep from browning.


Next in either a large pot or a large skillet (skillet is preferable, I just don't have one big enough so I use a pot) melt the butter over a medium heat. Remove apples from water and add to the hot buttery pot/skillet. 
Stir together for about 3 minutes, coating the apples in the butter.


Then add Cinnamon and Brown Sugar, stir well for 5 minutes.  


 Once sugar is nicely melted and apples are well coated, combine 1 tablespoon cornstarch with 1 tablespoon water to the mix to thicken. Add more corn starch if needed. 
Remove from heat to allow to cool a bit. 


Meanwhile the puff pastry sheets should be thawed.
Unwrap and spread your first pastry sheet onto flower dusted cutting surface. 


 Then cut into 4 smaller squares. I use a pizza cutter.


Add a scoop of apple mixture to the center of  each square.


Yuuummmmmmmmmmmm... 


Fold the pastry dough into triangles, it should be stretchy but you may need to repair tears. 
I like to use a fork to smoosh edges together.

Coat cookie sheet with non stick baking spray or very light butter. 

Then, using a spatula, carefully place turnovers onto the sheet.

You should have 8 total. 

Place in oven and bake for about 25 minutes or until golden.


 When done remove from oven and allow to cool completely ... 


They smell soooo apple-cinnamony good!


Optional Icing:
1 cup confectioners sugar
1 teaspoon vanilla
1 tablespoon milk
Mix together ... add more milk if needed and drizzle over pastry - a delicious extra treat!
*Be sure the pastry is completely cool before adding icing or you have a huge melty mess! 


I hope you all enjoy this recipe ... they are very quick and easy to throw together.  I do cheat by using the store bought pastry sheets, but they still taste delicious! 

Left over apple mixture would go great on a bowl of vanilla ice cream! ;)

Friday, September 7, 2012

Simple Crochet Hat/Beanie Pattern


I have searched and searched for a basic crochet beanie/hat since I first started crocheting. I have tried several different hat patterns and finally figured the best "recipe" for a simple beanie that worked for me. I could whip one of these up in the course of an evening.  Add frills at your own discretion.


This is my first real attempt at writing out a pattern - it's super simple so that made it feel possible. . .


Simple Beanie Pattern

Materials:
Yarn: Worsted Weight ... I used "I Love This Yarn"
Hook: I
Needle for Darning

Stitches Used:

  • Magic Ring
  • Chain
  • Double Crochet (DC)
  • Slip Stitch
The hat is made in rounds, joined at the end of each round. 


Rnd 1: Start with Magic Ring... Chain 2, 9 double crochet. Slip stitch in top of first chain 2 (10 sts)

Rnd 2: Chain 2, double crochet in same stitch. 2 double crochet in each stitch around. Join with slip stitch in top of first Chain 2. (20 sts)

Rnd 3: Chain 2, 2 DC in next stitch. *1DC in next stitch, 2DC in next stitch* Join with slip stitch in top of first Chain 2. (30 sts)

Rnd 4: Chain 2, DC in next stitch, 2 DC in next stitch. *1 DC in next 2 stitches, 2 DC in next stitch. Repeat from*  Join with slip stitch in top of first Chain 2. (40 sts)

Rnd 5: Chain 2, DC in next 2 sts, 2 DC in next stitch. *1 DC in next 3 stitches, 2 DC in next stitch. Repeat from*  Join with slip stitch in top of first Chain 2. (50 sts)

Rnd 6: Chain 2, DC in next 3 stitches, 2 DC in next stitch. *1 DC in next 4 stitches, 2 DC in next stitch. Repeat from*  Join with slip stitch in top of first Chain 2. (60 sts)

Rnd 7-16: Chain 2, DC in every stitch.  Join with slip stitch in top of first Chain 2 . Fasten off and weave in yarn. (60 sts)*


*You may need to increase the amount of row depending on the size of the head you are making the hat for. This pattern worked for my head, but if you need a larger size add more rows.

Good Luck! 


Fun Fall Fingerless Gloves!

Fall is quickly approaching I decided to make some fun accessories... The fingerless gloves seemed perfect! I absolutely LOVE how these turned out. 

I got the basic idea from Lucy at Attic 24 ... she called them Wrist Warmers. From Lucy's instructions I kept the edging, basic concept of crocheting in rows and sewing up the edge to finish. I also used her pattern for the little flower establishments. I varied from her pattern though in that I made mine a bit more fitted around the wrist. . . I decreased by 2 for a couple rows near my wrist. This is a much snugger fit - the other way was a bit boxy for me but I guess it helps to accommodate for watches and bracelets ... which I don't wear. 


Here is the basic pattern for making these:
- Chain as many as needed to fit snug around your wrist or forearm. Yarn and hook size don't matter here ... as long as you are happy with the tightness/looseness of the stitches. I find some give is good! 
- Then work in rows back and forth until you have the length desired. The Half Double Crochet stitch is what  most people like to use. Remember if you want a more fitted glove you may want to decrease for a few rows  right where your wrist meets your hand. Just don't forget to increase again for the part that cover your hand! (I only decreased 2 times for mine).
- Sew up the sides - but don't forget the thumb!
- About and inch/inch and half down  is a good measurement for the thumb, but as everyone's hand is different this could be different for you. :)
- Viola! Embellish as desired ... *
I suppose this isn't a real pattern ... Lucy probably explains it better on her site. 
*These can be one solid color or striped - your call! 

I'm still new at writing out patterns or giving instructions. 

Wednesday, August 29, 2012

Amigurumi - Crochet Toys


I have been wanting to write a post about some of the amigurumi projects I have worked on in the past for some time now. Making toys is what first got me excited about crochet, and I still LOVE to make them. There is something very satisfying about creating all the different elements and then putting them together to make a creature with a little face. . . 

The ant in the picture above is my own creation ... but I didn't record the pattern ... sorry!
Anyway - hope you enjoy!


This is the best octopus pattern I have found. Small, cute and quick to whip up! I purchased this pattern from Ruby Submarine - I highly recommend this pattern!

 This was another fun quick little project ... I could make a million of these little guys! I found this Turtle pattern on Ravelry ... I just made a few small alteration. I love free patterns!


These fish, and many of the following critters I found in two books by Ana Paula. I highly recommend her pattern books to anyone who would like to make some toys, I was still very new to crochet when I bought these books and still had little trouble following her patterns. The great thing about amigurumi is the only stitch you really need to know how to do is single crochet. It's a fun way to start crochet!


The little lion is one of my favorites!


This squid was the first toy I ever made! I was so proud! :)
I apologize for the poor quality of some of these photos,
many of them were taken with my old camera  phone.
I created this Squidbilly all on my own. I didn't write down the pattern ...
 Well, that's about it for now ... I have made many other toys but can't seem to find any other pics... Let me know if you have any questions about how to find toy patterns! 


Monday, July 23, 2012

Blooming Flower Cushion

COLORS!!!

I finished my first ever pillow cover! I got my inspiration yet again from the wonderful Lucy of Attic24. Her "Blooming Flower Cushion" was so cheerful I knew I would have to give it a try. . .


This is yummy yarn. Feels great to work with!

 Aaaah ... the beginning ... 


 OOOOOOOOOooooooooooooooooooooooooooooooooooooooohhhhhhhhhhhhhh!

It GROWS!!!


I took a little break ... I had to wait for my pillow form to arrive! 
But as soon as it came ... it didn't take long for me to finish!

 Left: Back of Cushion - Right: BLOOMING FLOWER!
 COLORS!!!!

A shot of back of the flowery part - so basically behind the petals ... still pretty though!


 I know I'm posting a lot of pics ... but I just love these colorful petals!


Time to start stitching these suckers together!


If I had any skills with a sewing machine I would have lined each side and put in a zipper ... 
BUT I don't, so I just stitched it all the way up ... 
there is some extra stuffing so I think it will hold up over time. 


You know you want to snuggle this! 

 SOOOO HAPPY!!!!


I can't thank Lucy from Attic24 enough for her fantastic tutorial <-click here! 
She always can make the most daunting of patterns or projects easy to follow and fun to create!

Hope you all enjoyed my colorful creation!